This is Part 3 of 4 in the Fitness Series. The full path:
- Part 1 - The Goal (2 sub-articles):
- Part 2: Structure of a Day - the daily framework
- Part 3 - The Program (3 sub-articles):
- Part 3.1: Concepts - the conceptual foundation
- Part 3.2 (this article): Rules and Building the Program - contexts
- Part 3.3: Example Programs - practicalities
- Part 4: Pharmacology - supplements and beyond
Table of Contents
- The four growth rules
- The execution rules
- Building the program
- Part 3.2 Takeaways
- Your Pre-Program Task List
- Sources & references
Part 3.1 covered the conceptual layer — fatigue vs. stimulus, real vs. fake progressive overload, biasing, MRV. This article is about the rules that turn those concepts into a working program. There are two layers: the growth rules (what makes a stimulus actually drive hypertrophy) and the execution rules (how to run sessions and a long-term program without sabotaging yourself).
The four growth rules
These four rules cover most of what makes a program actually work.
Hit each muscle region at least twice a week
The 2016 Schoenfeld meta-analysis on training frequency found that hitting a muscle group at least twice per week produces meaningfully more hypertrophy than once weekly, with the effect most pronounced in untrained and intermediate lifters.1 Whether 3× or 4× is better than 2× is murkier — once frequency hits twice weekly, it stops being the variable that matters most. But once a week per muscle leaves growth on the table.
This rule locks in the “split” decision later. Any split — whatever the exercise selection — has to ensure every major muscle gets two stimulating sessions a week.
8–12 reps × 2–3 sets per exercise (for hypertrophy)
The 8–12 rep range isn’t magic, but it’s the practical sweet spot for most exercises and most lifters. Heavy enough to produce real mechanical tension, light enough that a meaningful number of reps can be done near failure without getting wrecked, and metabolically demanding enough to recruit higher-threshold motor units by the last rep.
Run 2–3 working sets per exercise, depending on how taxing the movement is. A heavy compound like Hack Squat earns 3 sets; an isolation like Lateral Raise gets 2. The difference isn’t laziness — it’s that compound movements stimulate the target muscle while training stabilizers and accessories simultaneously, so each set delivers more total stimulus and fewer are needed. Isolation movements are surgical, so more sets can be added without redundant fatigue.
Use double progression to measure honest progress
Double progression is the cleanest framework for forcing real progress. The rules are simple:
- Pick a rep range — say 8–10.
- Pick a starting weight where 8 clean reps with maybe 1–2 reps in reserve on the last set is achievable.
- Each session, try to add reps within the range.
- Once the top of the range (10 reps) is hit on all working sets with good form, increase the weight at the next session — usually by 2.5 kg (or a micro-load if 2.5 kg is too aggressive) — and drop back to the bottom of the range (8 reps).
- Repeat.
Why this works It forces both dimensions of progression — load and reps — to climb. It can't be faked. If a rep can't be added this week, the load isn't ready to come up. If reps have capped out but the load isn't budging, form has loosened or effort dropped. Either way the data tells the truth.
The last set has to actually get to failure (form is the cue)
This is the rule people skip the most, and it’s the one that decides whether growth is happening or just exercise.
The reason: every rep in a set serves a different purpose. The first 4–5 reps are mostly for recruiting the high-threshold motor units that drive growth. The last 2–3 reps, taken close to failure, are where those high-threshold fibers actually experience real mechanical tension — that’s the growth signal. Stopping with 4 reps left in the tank generates fatigue without ever getting to the part of the set that produces the actual stimulus.
A clean set structure looks like this:
| Set | RIR | Purpose |
|---|---|---|
| Set 1 | ~2 RIR | Clean reps, controlled tempo, getting the body warm in the movement pattern |
| Set 2 | ~1 RIR | Heavier or more reps. Real working effort |
| Set 3 (top set) | 0 RIR | True failure or one shy of it. The set that drives the adaptation |
The point of the earlier reps is to recruit as much fiber as possible, so that by the time the failure rep is reached, actual mechanical failure is reached — no more fibers available to be recruited for the task. That's the signal the body uses to decide it needs to build more fiber for next time.2
To failure means you reach the point where you cannot complete another rep with the same standard.
It does not mean:
- Half reps.
- Bounce reps.
- Throwing your body around.
- Changing the movement to make it easier.
Failure is “I cannot produce another rep”
The form-break cue Standardized form across the program isn't just for aesthetics — it's the signal for when a set is actually done. With a tight, repeatable form, the rep where form starts breaking is the cue that you're failing.
Not the rep that feels heavy. Not the rep where it gets uncomfortable. The rep where the bar path drifts, the elbows flare, the hips shoot up, the knees cave — that’s mechanical failure expressing itself through compensation. Stop there. Cheat reps past that point are fake progressive overload (see Part 3.1 on this).
Not every set needs to go to failure — that’s a recipe for breakdown. But the last working set on each exercise needs to be honest, and form is the referee.
The execution rules
The growth rules above describe what makes stimulus work. The execution rules describe how to actually run sessions and a long-term program. These get skipped more often, and skipping them is what makes intelligent programs fail in practice.
Skip the stretches and the warm-up theatre (there’s a better way)
Static stretching before a lifting session is at best neutral and at worst counterproductive. The research is reasonably clear: short-duration stretches under 60 seconds per muscle have trivial effect (~1–2% performance decrement), but anything past 60 seconds produces measurable strength and power decline of 4–7.5%.3 For a hypertrophy or strength session, that’s giving up real intensity for no benefit.
What actually matters before a working set is muscle temperature and movement pattern grooving — and both come from the lift itself.
The warm-up protocol
- Stay warm on the way to the gym. Sit in a hot car, stay bundled, whatever keeps core temperature up. Don’t walk into the gym cold and try to manufacture warmth through stretching.
- Cascade up to working weight on the first exercise of each muscle group. Empty bar for 8 reps, ~50% of working weight for 5 reps, ~75% for 3 reps, then start working sets. Each warm-up set primes the nervous system for the next without producing real fatigue. Read How to Warm Up for a Heavy Lift below.
- No warm-up sets needed for subsequent exercises hitting the same muscle group — that muscle is already warm from the first exercise.
How to actually warm up for a heavy lift
Let’s say your working weight for bench press is 100kg for 3 sets of 8 reps. Here’s how you would structure your warm-up:
- Start with the empty bar (20kg) – 1 set of 10-15 reps
- Focus on form, full range of motion, and bar speed
- Get the blood flowing to the muscles involved
- First warm-up set: ~50% of your working weight → 50kg x 6 reps
- This is light enough to continue warming up but adds some resistance
- Second warm-up set: ~70% of your working weight → 70kg x 4 reps
- The weight is getting heavier, but still manageable
- Still not pushing to failure
- Final warm-up set: ~85% of your working weight → 85kg x 2 reps
- This is close to working weight, so it’s preparing your nervous system
- Keep it crisp and controlled, no grinding reps
- First working set: 100kg x 8 reps
General Warm-Up Guidelines for Any Lift
- Start with an empty bar or very light weight
- Use 3-4 progressively heavier warm-up sets
- Keep reps lower as weight increases (don’t fatigue yourself)
- Rest 30-60 seconds between warm-up sets
- Rest fully before your first working set (2-3 min if needed)
The exception Anyone with specific mobility limitations (chronically tight hip flexors restricting squat depth, immobile thoracic spine restricting overhead position) may need targeted mobility work before training, and that's a different conversation from generic pre-workout stretching. Do it strategically, not as ritual.
For a deeper read: Paul Ingraham’s overview at PainScience covers the research thoroughly.
Form Standards and Avoiding Momentum
A rep only counts if it meets your program’s form standard. If you’re unsure how to perform an exercise, study the videos provided and/or ask me for help.
The general rules that apply to almost every exercise:
- Same range of motion every rep
- Same setup every set
- Same bracing and body position
If your form changes rep-to-rep, you can’t track progression properly and if you can’t track progression, you can’t build a physique.
Momentum and “Cheating”
The most common offenders:
- Rows turning into a standing hip-hinge swing
- Lateral raises turning into a full-body heave
- Curls turning into a back extension
- Leg presses where depth disappears the moment it gets hard
Remember: we’re here to train the muscle, not move the weight. The outcome you want is a physique not a number on the bar that you only hit through momentum.
Intensity is the variable that matters
Every set that must be trained to failure, must be trained to PROPER failure. No reps should be left in reserve. Most people under-train intensity and over-train volume. The fix is mental, not programmatic. Understanding RIR and mechanical failure is the most important skill in this entire program. The earlier rule about “last set hits failure” only works if RIR estimates are honest and most lifters chronically overestimate how much they have left in the tank.
Calibrate by occasionally taking a set to true mechanical failure (the rep where form breaks despite maximum effort). Compare how many reps were actually achievable to what was estimated mid-set. Most people find their “RIR 1” was actually RIR 3 or 4. Once calibrated, the intensity required for growth becomes much clearer.
3 minutes rest between sets
Always.
Three minutes between working sets is non-negotiable for hypertrophy training.
The reason is the central nervous system. Heavy sets near failure deplete CNS resources, and shorter rest periods (60–90 seconds) don’t allow full neural recovery. Without that recovery, the next set generates less force, recruits fewer high-threshold motor units, and falls short of true failure. The set count looks the same on paper, but the stimulus per set is degraded.
Three minutes is the floor for compound lifts and heavy isolation work. Four to five minutes is fine, especially on the heaviest compounds. Going under three minutes means accepting that none of the working sets after the first one will be truly maximal — which means none of them will actually produce the failure-driven growth signal the program depends on.
This is also where most people compromise. Phone-scrolling between sets is fine; cutting rest short to “save time” is sabotage.
Soreness is not a growth signal
You don't need to be sore to grow.
Delayed onset muscle soreness (DOMS) is a marker of unaccustomed eccentric stress, not of training quality. Beginners and lifters changing exercises feel it heavily. Lifters running the same exercises for months stop feeling it — and that doesn’t mean they’ve stopped growing. Often the opposite.
Chasing soreness leads to programming choices that maximize damage (extreme stretches under load, excessive eccentric tempo, novel exercises every session) rather than choices that maximize stimulus. Damage and stimulus aren’t the same thing. The growth signal is mechanical tension at high motor unit recruitment, full stop.
A muscle that isn’t sore can absolutely be growing. A muscle that’s wrecked-sore for four days isn’t necessarily growing more — it might just be repairing more (see fatigue vs. stimulus in Part 3.1).
Don’t program-hop
This one is borrowed from the broader fitness community and worth quoting directly:
You WILL have intelligent people tell you that these programs are over-complicated and under-complicated. You need to decide for yourself where you fall on this spectrum and there isn't necessarily a right or wrong answer. I ENCOURAGE you to think through your stances, but do NOT become an exercise or program hopper constantly switching. This WILL hinder long-term gains.
Once a program is committed to, run it for at least 8–12 weeks before evaluating whether it’s working. Switching exercises every 2–3 weeks resets the neural adaptation curve constantly (see adaptation timeline in Part 3.1) and means the muscle never gets to the hypertrophy phase of progress. The sense of “trying new things to keep the muscles guessing” is exactly backward — the muscles aren’t guessing, they’re learning, and learning takes time.
If a program isn’t working after 8–12 weeks, change one variable at a time and observe. Don’t rebuild the whole thing.
Understanding Tempo (Eccentric - Pause - Concentric - Pause)
Each exercise has a tempo written in a four-digit format, such as 2-1-1-0. This represents the speed of each part of the rep:
- First number (Eccentric): The time spent lowering the weight (e.g., 2 seconds).
- Second number (Pause at the bottom): The time spent at the bottom position (e.g., 1 second).
- Third number (Concentric): The time spent lifting the weight (e.g., 1 second).
- Fourth number (Pause at the top): The time spent at the top before starting the next rep (e.g., 0 seconds).
Example (2-1-1-0) on a Bench Press:
- Lower the bar over 2 seconds.
- Pause at the chest for 1 second.
- Press the bar up over 1 second.
- No pause at the top, immediately start the next rep.
It is crucial to follow the tempo exactly as prescribed. Tempo ensures proper muscle engagement, control, and progression rather than just moving weight from point A to B.
Track everything
This was covered in Part 2 but it’s worth restating in a training context: there's no way to progress easily without proper tracking of performance over time. Every set, every weight, every rep, every RPE.
Use Hevy or any equivalent tracking app. The reason is double progression (the third growth rule above) — without an accurate record of what was done last session, there’s no honest way to know whether to add reps, add weight, or hold steady. Memory isn’t reliable enough at the level of precision the program needs.
Once a plan is decided, program it into a tracking app or a digital/physical notepad. Every session, log the actual numbers. Review weekly to see whether progression is happening.
- Log each set in real-time: After completing a set, enter the weight and reps. This allows you to track progress accurately and see previous numbers.
- Use the rest timer: The app automatically sets different rest times for each exercise based on its intensity and complexity. Use this to avoid resting too long or too short.
- Track workout duration: The app records how long your session takes, helping assess consistency and efficiency.
- Rate workout difficulty: At the end of each session, rate how hard the workout felt to track fatigue and recovery.
Progress pictures and form check videos
Two visual checks worth running consistently.
Progress pictures Take them often — weekly or every two weeks, same lighting, same poses, same time of day, same level of pump (or lack thereof). The mirror lies because change is gradual; pictures don't. They also catch fat gain or recomp progress that the scale alone can miss.
Form check videos every few weeks This is the catch for fake progressive overload. Record working sets every 4–6 weeks and compare current form to form 2–3 months ago.
If the bar path, depth, torso angle, or movement pattern has shifted to allow more weight, the muscle being trained has shifted with it. Progress is no longer real — it’s just load redistribution.
When this happens, reduce the weight until form returns to where it was. Trade a few weeks of “going backward” on the number for actually rebuilding the muscle being targeted. The number that comes back will be honest.
Building the program
The growth rules and execution rules above describe how to train. The structural pieces below describe what to actually train and they build on each other. Joint movements are the atomic unit; compound and isolation movements are combinations of those atoms; main vs. accessory roles emerge from the combinations; carryover is what makes accessories matter; variations are how the same compound is expressed across many exercises; and the Variation Cycle is how those variations are programmed across months and years.
Each piece below answers a question the previous one raises.
Joint movements: the foundation
Before any exercise selection, the human body’s joint movements need to be understood. There are 24 distinct joint movements that hypertrophy training cares about - flexion/extension/abduction/adduction at various joints, plus the rotational movements at the shoulder. Every muscle in the body exists to produce or stabilize one or more of these movements.
Programming becomes much easier when “chest day” is replaced with “horizontal pushing” or “shoulder horizontal adduction.” When the movement and the plane (sagittal, frontal, transverse) can be named, the difference between two exercises that seem similar becomes clear, and the redundancy between two exercises that look different becomes visible.
Bench press and dips both involve horizontal pushing, but they hit the chest at different angles relative to the torso. Lat pulldown and barbell row both train the lats, but one is vertical pulling and the other horizontal.
The 24 movements, grouped by region:
The 24 joint movements
Back (4)
- Vertical Pull (frontal-plane shoulder adduction + elbow flexion)
- Horizontal Pull — Low Row (shoulder extension + elbow flexion, low angle)
- Horizontal Pull — High Row / Scapular Row (shoulder horizontal abduction + scapular retraction)
- Spinal Extension (erector-driven trunk extension)
Legs (6)
- Knee Flexion (hamstring curl pattern)
- Knee Extension (quad-dominant extension)
- Plantarflexion + Dorsiflexion (calf raise through full ROM, training calves and tibialis together)
- Hip Adduction (bringing the leg toward midline)
- Hip Abduction (taking the leg away from midline)
- Hip Extension (glute-driven hip drive)
Arms (5)
- Elbow Flexion — Neutral grip (brachialis/brachioradialis-focused)
- Elbow Flexion + Shoulder Extension (biceps long-head bias — incline curl, drag curl)
- Elbow Extension — Overhead (triceps long-head bias)
- Elbow Extension — Pressdown (triceps lateral/medial bias)
- Wrist Flexion + Extension (forearm flexors and extensors)
Chest (3)
- Shoulder Horizontal Adduction — Low to High (dip, low-cable fly — lower pec / sternal head)
- Shoulder Horizontal Adduction — Fly (mid-pec / clavicular head)
- Horizontal Push (bench press pattern — chest, anterior delt, triceps)
Shoulders (4)
- Shoulder Flexion / Vertical Push (front raise, overhead press — anterior delt)
- Shoulder Abduction (lateral raise — medial delt)
- Shoulder Horizontal Abduction (rear-delt fly — posterior delt + infraspinatus)
- Shoulder External + Internal Rotation (rotator cuff — infraspinatus, teres minor, subscapularis)
Abs (2)
- Spinal Flexion (rectus abdominis, internal/external obliques)
- Hip Flexion (iliopsoas, rectus femoris, TFL)
Mapping joint movements to muscle regions
The reason naming joint movements matters: ==each muscle region has a primary joint movement (or two) that trains it.== Skipping a movement means skipping the muscle. The table below cross-references the 24 movements against the muscle regions most lifters actually subdivide for hypertrophy purposes.
| Muscle region | Primary joint movement(s) that train it |
|---|---|
| Lats (upper and lower) | Vertical Pull (upper lats / teres major), Horizontal Pull — Low (lower lats) |
| Traps (upper, middle, lower) | Horizontal Pull — High Row / Scapular Row (mid + lower traps), shoulder shrug pattern (upper traps) |
| Erectors | Spinal Extension |
| Chest (clavicular + sternocostal) | Horizontal Push, Shoulder Horizontal Adduction — Fly (mid-pec / clavicular), Low-to-High Adduction (lower / sternal) |
| Shoulders — Anterior delt | Shoulder Flexion / Vertical Push (also recruited heavily in Horizontal Push) |
| Shoulders — Medial delt | Shoulder Abduction (lateral raise) |
| Shoulders — Posterior delt | Shoulder Horizontal Abduction (rear-delt fly) |
| Rotator cuff (infraspinatus, teres minor, subscapularis) | Shoulder External + Internal Rotation |
| Biceps (biceps brachii — short and long head) | Elbow Flexion + Shoulder Extension (long-head bias — incline curl, drag curl) |
| Brachialis / Brachioradialis | Elbow Flexion — Neutral grip (hammer curl, reverse curl) |
| Triceps — Long head | Elbow Extension — Overhead (overhead extension) |
| Triceps — Lateral / Medial heads | Elbow Extension — Pressdown (pressdown variations) |
| Forearms (flexors / extensors) | Wrist Flexion + Extension |
| Quads (vastus lateralis, medialis, intermedius, rectus femoris) | Knee Extension (also Hip Flexion for rectus femoris specifically) |
| Hamstrings (short head, long head) | Knee Flexion (short head bias), Hip Extension (long head bias — RDL pattern) |
| Glutes (glute medius, upper and lower glute max) | Hip Extension (glute max), Hip Abduction (glute medius) |
| Adductors | Hip Adduction |
| Calves (gastrocnemius — lateral + medial — and soleus) | Plantarflexion (full ROM) |
| Tibialis | Dorsiflexion (trained with calves through full ROM) |
| Abs (rectus abdominis) | Spinal Flexion |
| Obliques (internal + external) | Spinal Flexion (with rotation/lateral flexion variants) |
| Hip flexors (iliopsoas, TFL) | Hip Flexion |
| Serratus | Recruited as stabilizer in scapular protraction; no clean dedicated joint movement — trained via push-up variations and overhead pressing |
| Neck | No movement listed in the 24; trained separately as flexion/extension/lateral flexion if pursued |
What this table is for It's an audit tool. Run a finger down the muscle column and ask: is the joint movement that trains this muscle present in my week? If a region has no joint movement covering it, that region isn't being trained — no matter how many exercises are in the program.
How compound movements emerge from joint movements
A compound movement isn’t a category that exists separately from joint movements — it's a pattern that combines two or more joint movements into one exercise. That’s what makes it compound: multiple joints working together produce one coordinated lift.
This is why “the six compound movements” exist. They aren’t arbitrary — each one is a combination of joint movements that maps to one of the six fundamental movement patterns of human strength:
| Compound pattern | Joint movements combined | Example exercises |
|---|---|---|
| Vertical Push | Shoulder flexion + elbow extension | Overhead press, machine shoulder press, seated DB press |
| Vertical Pull | Shoulder adduction (frontal-plane) + elbow flexion | Pull-up, lat pulldown, weighted chin-up |
| Horizontal Push | Shoulder horizontal adduction + elbow extension | Bench press, dip, machine chest press |
| Horizontal Pull | Shoulder horizontal abduction (or extension) + elbow flexion | Barbell row, chest-supported row, cable row |
| Squat | Hip extension + knee extension + ankle plantarflexion | Back squat, hack squat, front squat |
| Hinge | Hip extension (knee mostly stable) | Conventional deadlift, RDL, trap bar deadlift |
Every program has to express all six compound patterns within a week. Skipping one develops a structural weakness that limits everything else.
Why single-joint movements still exist
If compound movements train multiple muscles at once, why bother with single-joint isolation work?
Two reasons.
First — some joint movements don’t appear inside any of the six compounds. Hip abduction, hip adduction, shoulder abduction (lateral raise), rear-delt fly, knee flexion (hamstring curl), wrist flexion, neck (none of these are reached by squat, hinge, push, or pull patterns). The compounds are necessary but not sufficient. The single-joint movements fill the gaps the compounds can’t.
Second — even inside a compound, the limiting muscle might not be the muscle being targeted. A bicep curl trains the biceps directly. A pulldown trains the lats through the biceps, meaning the biceps fail before the lats are fully stimulated. This is the bottleneck problem, and it’s the bridge to the next section.
When isolation matters more than compound A lifter whose lats are well-developed but biceps are weak will plateau on pulldowns long before they plateau on biceps curls. The single-joint curl is what breaks the bottleneck on the multi-joint pulldown.
Main movements vs. accessory movements
Inside any compound, some muscles do the main work and others do the accessory work. The split isn’t about which muscle is “more important”, it’s about which muscle the lift is trying to grow vs. which muscles are along for the ride.
Vertical Pull (lat pulldown / pull-up)
- Main muscle: Lats (specifically: shoulder adduction in the frontal plane).
- Accessory muscles: Biceps (elbow flexion), rear delts (scapular stabilization), forearms (grip).
The lift is for the lats. The biceps are required for the elbow flexion portion of the movement, but they’re not the target — they’re the link in the chain that lets the lats get loaded.
This relationship has a structural consequence:
Compounds are limited by their weakest accessory. Weak biceps cap pulldown so the lats don’t get the full stimulus. Weak triceps cap bench press before the chest is fully stimulated. Weak forearms cap deadlift before the posterior chain is fully loaded.
The bottleneck strategy When a compound stalls because of a specific weak link, attack that weak link with isolation work for 4–8 weeks before pushing the compound again. Weak biceps capping the pulls? Hammer curl progression for two months, then come back to pulldown — the lat stimulus will have improved because the biceps are no longer the bottleneck.
This is the connection that makes the next concept work.
Carryover: how accessory work compounds
The bottleneck strategy works because of carryover: strength built in an isolation movement transfers to the compound that uses the same muscle as an accessory.
When biceps strength rises through dedicated curl work, the lats don’t suddenly become stronger — but the pulldown gets stronger, because the biceps are no longer the limiting factor in the chain. Now the lats are the limit again, and progressive overload on pulldowns can resume.
Carryover runs in two directions:
- Isolation → compound. Stronger biceps make pulls go up. Stronger triceps make presses go up. Stronger erectors make squats and deadlifts go up.
- Compound → compound (within a movement pattern). Strength built in one variation transfers to other variations of the same pattern. Strengthening the upper chest with 8 weeks of incline bench doesn’t disappear when returning to flat bench — the flat bench picks up at a higher ceiling than where it was left off. (This is the mechanism that makes the Variation Cycle work — more on that below.)
Where carryover compounds long-term Over years of consistent training, the same movement pattern is being attacked from multiple angles. Every variation strengthens part of the pattern. Every isolation movement strengthens an accessory link. When the lifter cycles back to the original "key" variation, every weak point that previously capped progression has been worked on by some other movement. The ceiling is higher each time.
Direct vs. indirect sets
A natural side concept here. When a muscle is being trained, the sets it absorbs are either:
- Direct sets — the muscle is the main target of the exercise. Pulldown for lats. Curl for biceps. Squat for quads.
- Indirect sets — the muscle is recruited as an accessory in an exercise targeting something else. Biceps work in pulldowns. Triceps work in bench press. Hamstrings work in squats.
Both produce real stimulus. A muscle that gets 6 direct sets and 6 indirect sets per week is closer to 10–12 effective sets than to 6. This is why a well-designed program looks like it has “less” arm work or “less” hamstring work than a body-part split, those muscles are getting hammered indirectly through compound work, and direct sets are added on top of that to reach total volume.
Programming implication When auditing weekly volume per muscle (against MRV), count both direct and indirect sets. Treating indirect sets as "free" leads to over-volume on small muscles (biceps already getting 8 indirect sets per week from pulls + 6 direct sets from curls = 14 total, easily over MRV).
Why variations exist within a compound pattern
Here’s where most programs go wrong. They pick one exercise per compound pattern (one row, one bench, one squat) and run it forever. But "vertical pull" isn't a single exercise, it's a category that contains pull-ups, lat pulldowns, kneeling pulldowns, single-arm pulldowns, neutral-grip pull-ups, weighted chin-ups, and a dozen others.
Each of these is a vertical pull. Each of them combines roughly the same joint movements. But each one differs from the others on at least one of the following dimensions and those differences are why variation matters.
The seven axes of variation
Every variation of a compound pattern can be evaluated against seven axes. Two exercises that look similar might score very differently on these axes, and that’s what makes them genuinely different stimuli rather than the same thing in disguise.
The seven axes
- Stability
How much of the lifter’s effort goes into stabilizing the movement vs. producing force on the target muscle. A barbell back squat demands high stability (free weight, high CNS load); a hack squat demands low stability (machine handles the path). Lower stability lets more effort go to the target muscle.
- Overloadability
How easily load can be added session over session. A machine pulldown can climb 2.5 kg increments cleanly; a strict pull-up climbs only when bodyweight + added weight increases, in larger jumps. High overloadability = longer productive lifecycle on the variation.
- Isolation Potential
How cleanly the variation isolates the target muscle vs. spreading load across accessories. A chest-supported row isolates the back better than a bent-over barbell row, because the lower back / spinal erectors aren’t stabilizing the torso.
- Moment Arm
The mechanical leverage the muscle works against. A long moment arm (front raise with arms extended) means more torque on the muscle for the same load; a short moment arm (front raise with elbows bent) means less. Variations that lengthen the moment arm increase muscle tension at lower absolute loads.
- Effective ROM
The portion of the range of motion where the target muscle is under productive tension. A flat bench has full ROM but the chest is most loaded mid-range; a deficit push-up extends the productive ROM into the stretched position. A variation with longer effective ROM produces more stimulus per rep.
- Mind-Muscle Connection
How easily the lifter can feel the target muscle working. Some variations make the target muscle obvious (cable fly for chest); others let other muscles take over without the lifter noticing (heavy barbell bench, where shoulders or triceps may dominate).
- Resistance Curve / Biasing
Where in the ROM the load peaks. Free weights peak at the position where leverage is worst (mid-bench for bench press); cables and bands peak where the cable angle is shortest; chains peak at lockout. Different curves bias the stimulus toward different parts of the lift — and toward different parts of the muscle.
(Plus a non-stimulus consideration:) Safety — Risk of injury given the lifter’s leverages, joint history, and current fatigue state. A loaded barbell bench without a spotter scores poorly here; a chest press machine scores well.
How to use the axes When picking the next variation in a rotation, the axes give a structured way to choose. If the previous variation was high-stability and the lifter wants more isolation, swap to a variation that scores lower on stability and higher on isolation potential. If the previous variation had a poor resistance curve at lockout (where progress stalled), pick the next variation with a better curve in that range.
This is also why exercise selection isn't about "novelty for novelty's sake." Each rotation should change at least one axis intentionally, to address a weak point, to reduce a joint stress, or to expand the effective ROM, not just to feel different.
The Variation Cycle: programming for long-term progress
The growth rules cover what to do this week. The execution rules cover how to run sessions. The compound patterns cover what categories must be in the program. The seven axes explain why one variation differs from another. But none of these answer the question that decides whether progress continues 12, 18, or 36 months in: what happens when an exercise stops driving progress?
This is what the Variation Cycle addresses. It’s a structured way to rotate through variations of the same compound pattern so progressive overload keeps working over the long term, without random exercise-swapping, without deloads as a default, and without abandoning the rules above.4
The “don’t program-hop” rule from earlier handles a real failure mode, switching exercises every two weeks for novelty’s sake. But the opposite failure mode is just as real: running the same exercise variation forever, watching progression slow to a crawl, and trying to fix it with more volume. The standard “fix” is adding sets or extending the training block, which generates fatigue without producing more stimulus, eventually forces a deload, and resets the lifter back to where they were 4–6 weeks earlier.
The Variation Cycle addresses this directly. Instead of fighting the diminishing returns curve on one exercise, swap to a different variation of the same compound pattern at the moment the curve flattens. The new variation re-opens the progression window. Over multiple cycles, the lifter accumulates strength adaptations across several variations of the same pattern, and those adaptations carry over (per the carryover discussion above).
The lifecycle of a variation
Every exercise has a finite productive lifecycle, and the Variation Cycle makes that explicit.
How the lifecycle plays out
- Start at the upper limit of the rep range. First session on a new variation, the load is set so the upper limit (e.g., 12 reps in an 8–12 range) is achievable on the working sets with appropriate RIR.
- Add weight every session. Small, consistent load increments — whatever the lift can absorb without form breaking down.
- Reps decline naturally as load increases. Week by week, the rising load forces reps down through the range.
- The lifecycle ends when the lower limit can’t be hit. Once the lifter can no longer perform the lower limit (e.g., 8 reps) with good form on the prescribed sets, that variation has reached the end of its productive life — rotate to a new one.
Reconciling with double progression The double progression rule earlier in this article describes a more conservative progression style: hold weight, climb reps, then bump weight only when the top of the range is hit. The Variation Cycle's progression is load-first: add weight every session and let reps fall through the range.
Both share the same termination signal, the lifecycle is over when the lower rep limit can no longer be hit. Use double progression for accessory and isolation work where adding load every session is unrealistic. Use load-first progression on key compound lifts where small weekly load increments are achievable.
Lifecycle length tells you how good the variation is for you A long lifecycle (4+ months of weekly load increases) means the variation is well-suited to your leverages, weak points, and recovery. A short lifecycle (3–4 weeks before stalling) means it's a poor fit — and that's data, not a failure. The lifters with the longest training careers accumulate a personal roster of high-lifecycle variations through this exact process.
Rotating variations: the decision process
When a lifecycle ends, the next variation isn’t picked randomly. The seven axes of variation are the decision tool. The rotation should change at least one axis intentionally:
The rotation checklist
When the current variation can no longer hit the lower rep limit, ask:
- Does the new variation still advance the same compound pattern? Bench press → close-grip bench press = same horizontal-push pattern, different emphasis. Bench press → cable fly = different category. Stay inside the pattern.
- Which axis am I changing, and why? Address the weak point exposed by the previous variation. If bench stalled at lockout, triceps are likely the bottleneck — close-grip bench shifts the resistance curve toward triceps demand. If shoulders are getting irritated, an incline machine press shifts the stability axis (more support) and the safety axis (lower risk).
- Does it reduce joint stress while keeping muscular stimulus? If a joint is getting hammered by the current variation, the next pick should score better on safety without sacrificing effective ROM or moment arm.
Worked rotation chains
- Horizontal push: Flat barbell bench → Incline barbell bench → Close-grip bench → Weighted dip → back to flat barbell bench (with a stronger lockout from the close-grip block, and stronger stretched-position from the weighted dip block).
- Squat pattern: Back squat → Safety bar squat → Front squat → Hack squat → back to back squat.
- Hinge pattern: Conventional deadlift → Trap bar deadlift → Block pull → RDL → back to conventional deadlift.
- Vertical pull: Lat pulldown → Weighted chin-up → Neutral-grip pulldown → Single-arm pulldown → back to lat pulldown.
Each return to a previously-run variation should hit higher numbers than the previous lifecycle on that variation. That’s the test. If it doesn’t, something else (recovery, diet, sleep) is the bottleneck, not the program.
Iteration: building a personal exercise roster
Over enough cycles (12+ months of consistent rotation), patterns emerge in the data:
- Some variations consistently produce long lifecycles. Keep them in heavy rotation.
- Some variations consistently produce short lifecycles. Cycle them out, or use them only as accessories.
- Some variations expose specific weak points. Use them strategically when those weak points need attention.
The outcome is a personal roster of roughly 18–30 exercises (3–5 per compound pattern) that can be cycled indefinitely. This roster is what separates a lifter still progressing in year five from a lifter stuck on the same numbers since year two.
This only works with honest data Iteration is a long-term decision-making process based on what actually happened across multiple cycles. Without precise tracking — every set, every rep, every weight, in Hevy or equivalent — the iteration step collapses into guessing. The "track everything" rule from earlier isn't optional in the Variation Cycle; it's the input data the entire system runs on.
Important considerations for the Variation Cycle
A few principles that keep the Variation Cycle from collapsing into ordinary program-hopping:
Change only one variable at a time When a lifecycle ends, the exercise variation is the variable that changes, not the rep range, not the rest periods, not the split. Changing two variables at once destroys the data signal: there's no way to know whether the new variation worked, or whether the changed rep range did.
Eliminate diet and recovery as variables The data is only meaningful when sleep, food, and stress are roughly stable. A short lifecycle during a hard cut or a bad-sleep month doesn't mean the variation is a bad fit, it means recovery was the bottleneck. ==The Variation Cycle requires the nutrition foundation from Part 1.2 and the daily structure from Part 2 to be solid first.==
Don't make emotional decisions The temptation to switch a variation because it "feels stale" is the same trap as program-hopping. If the lower rep limit is still being hit cleanly, the lifecycle isn't over, boredom isn't a termination signal. Wait for the data.
How this connects to Part 3.3 presents two split templates with their own progression cycles (isolation → compound → back to isolation). That progression cycle is one specific application of the Variation Cycle — pre-built so a lifter can run it without designing the rotation from scratch. The general framework here gives the tools to design custom rotations once the templates start feeling restrictive.
Key terms
A reference glossary for the concepts above. Some terms overlap with vocabulary established earlier in the series — those overlaps are noted explicitly.
| Term | Meaning |
|---|---|
| Joint movement | One of the 24 distinct flexion/extension/abduction/adduction/rotation patterns the body produces. The atomic unit of programming. |
| Compound movement | An exercise combining two or more joint movements (e.g., vertical pull = shoulder adduction + elbow flexion). One of the six fundamental compound patterns. |
| Single-joint / isolation movement | An exercise involving one joint movement only (e.g., bicep curl = elbow flexion). Trains a single muscle directly. |
| Main muscle | The muscle a given exercise is designed to grow (e.g., lats on a pulldown). |
| Accessory muscle | A muscle recruited as a secondary contributor in a compound (e.g., biceps in a pulldown). Can become the bottleneck if undertrained. |
| Direct sets | Sets where the muscle is the main target. |
| Indirect sets | Sets where the muscle is recruited as an accessory in another lift’s main work. Both contribute to weekly volume. |
| Carryover | Strength and size adaptations from one variation or movement transferring to another that shares muscles or pattern. Runs in two directions: isolation → compound, and compound variation → compound variation. |
| Variation | A specific exercise expression of a compound pattern (e.g., flat barbell bench is a variation of horizontal push). |
| Seven axes of variation | Stability, overloadability, isolation potential, moment arm, effective ROM, mind-muscle connection, resistance curve / biasing — plus safety as a non-stimulus consideration. |
| Stimulus | Training stress applied to a muscle that triggers an adaptive response. Same definition used in Part 3.1. |
| Local fatigue | Joint, tendon, or connective-tissue accumulation from repeating the same variation. Distinct from systemic fatigue (Part 3.1). |
| Weak point | A muscle or portion of a movement that limits progress on the key lift. Same as the bottleneck concept from main movements vs. accessory movements. |
| Variation Cycle | The framework for rotating through variations of a compound pattern over time so progressive overload continues across lifecycles. |
| Lifecycle | The productive lifespan of one variation — from first session at the upper rep limit to the session where the lower rep limit can no longer be hit. Triggers rotation. |
| Rotation | Swapping to a new variation at the end of a lifecycle. |
| Iteration | The long-term process of cycling through variations across multiple lifecycles, using the data to learn which variations produce the longest lifecycles for this lifter. |
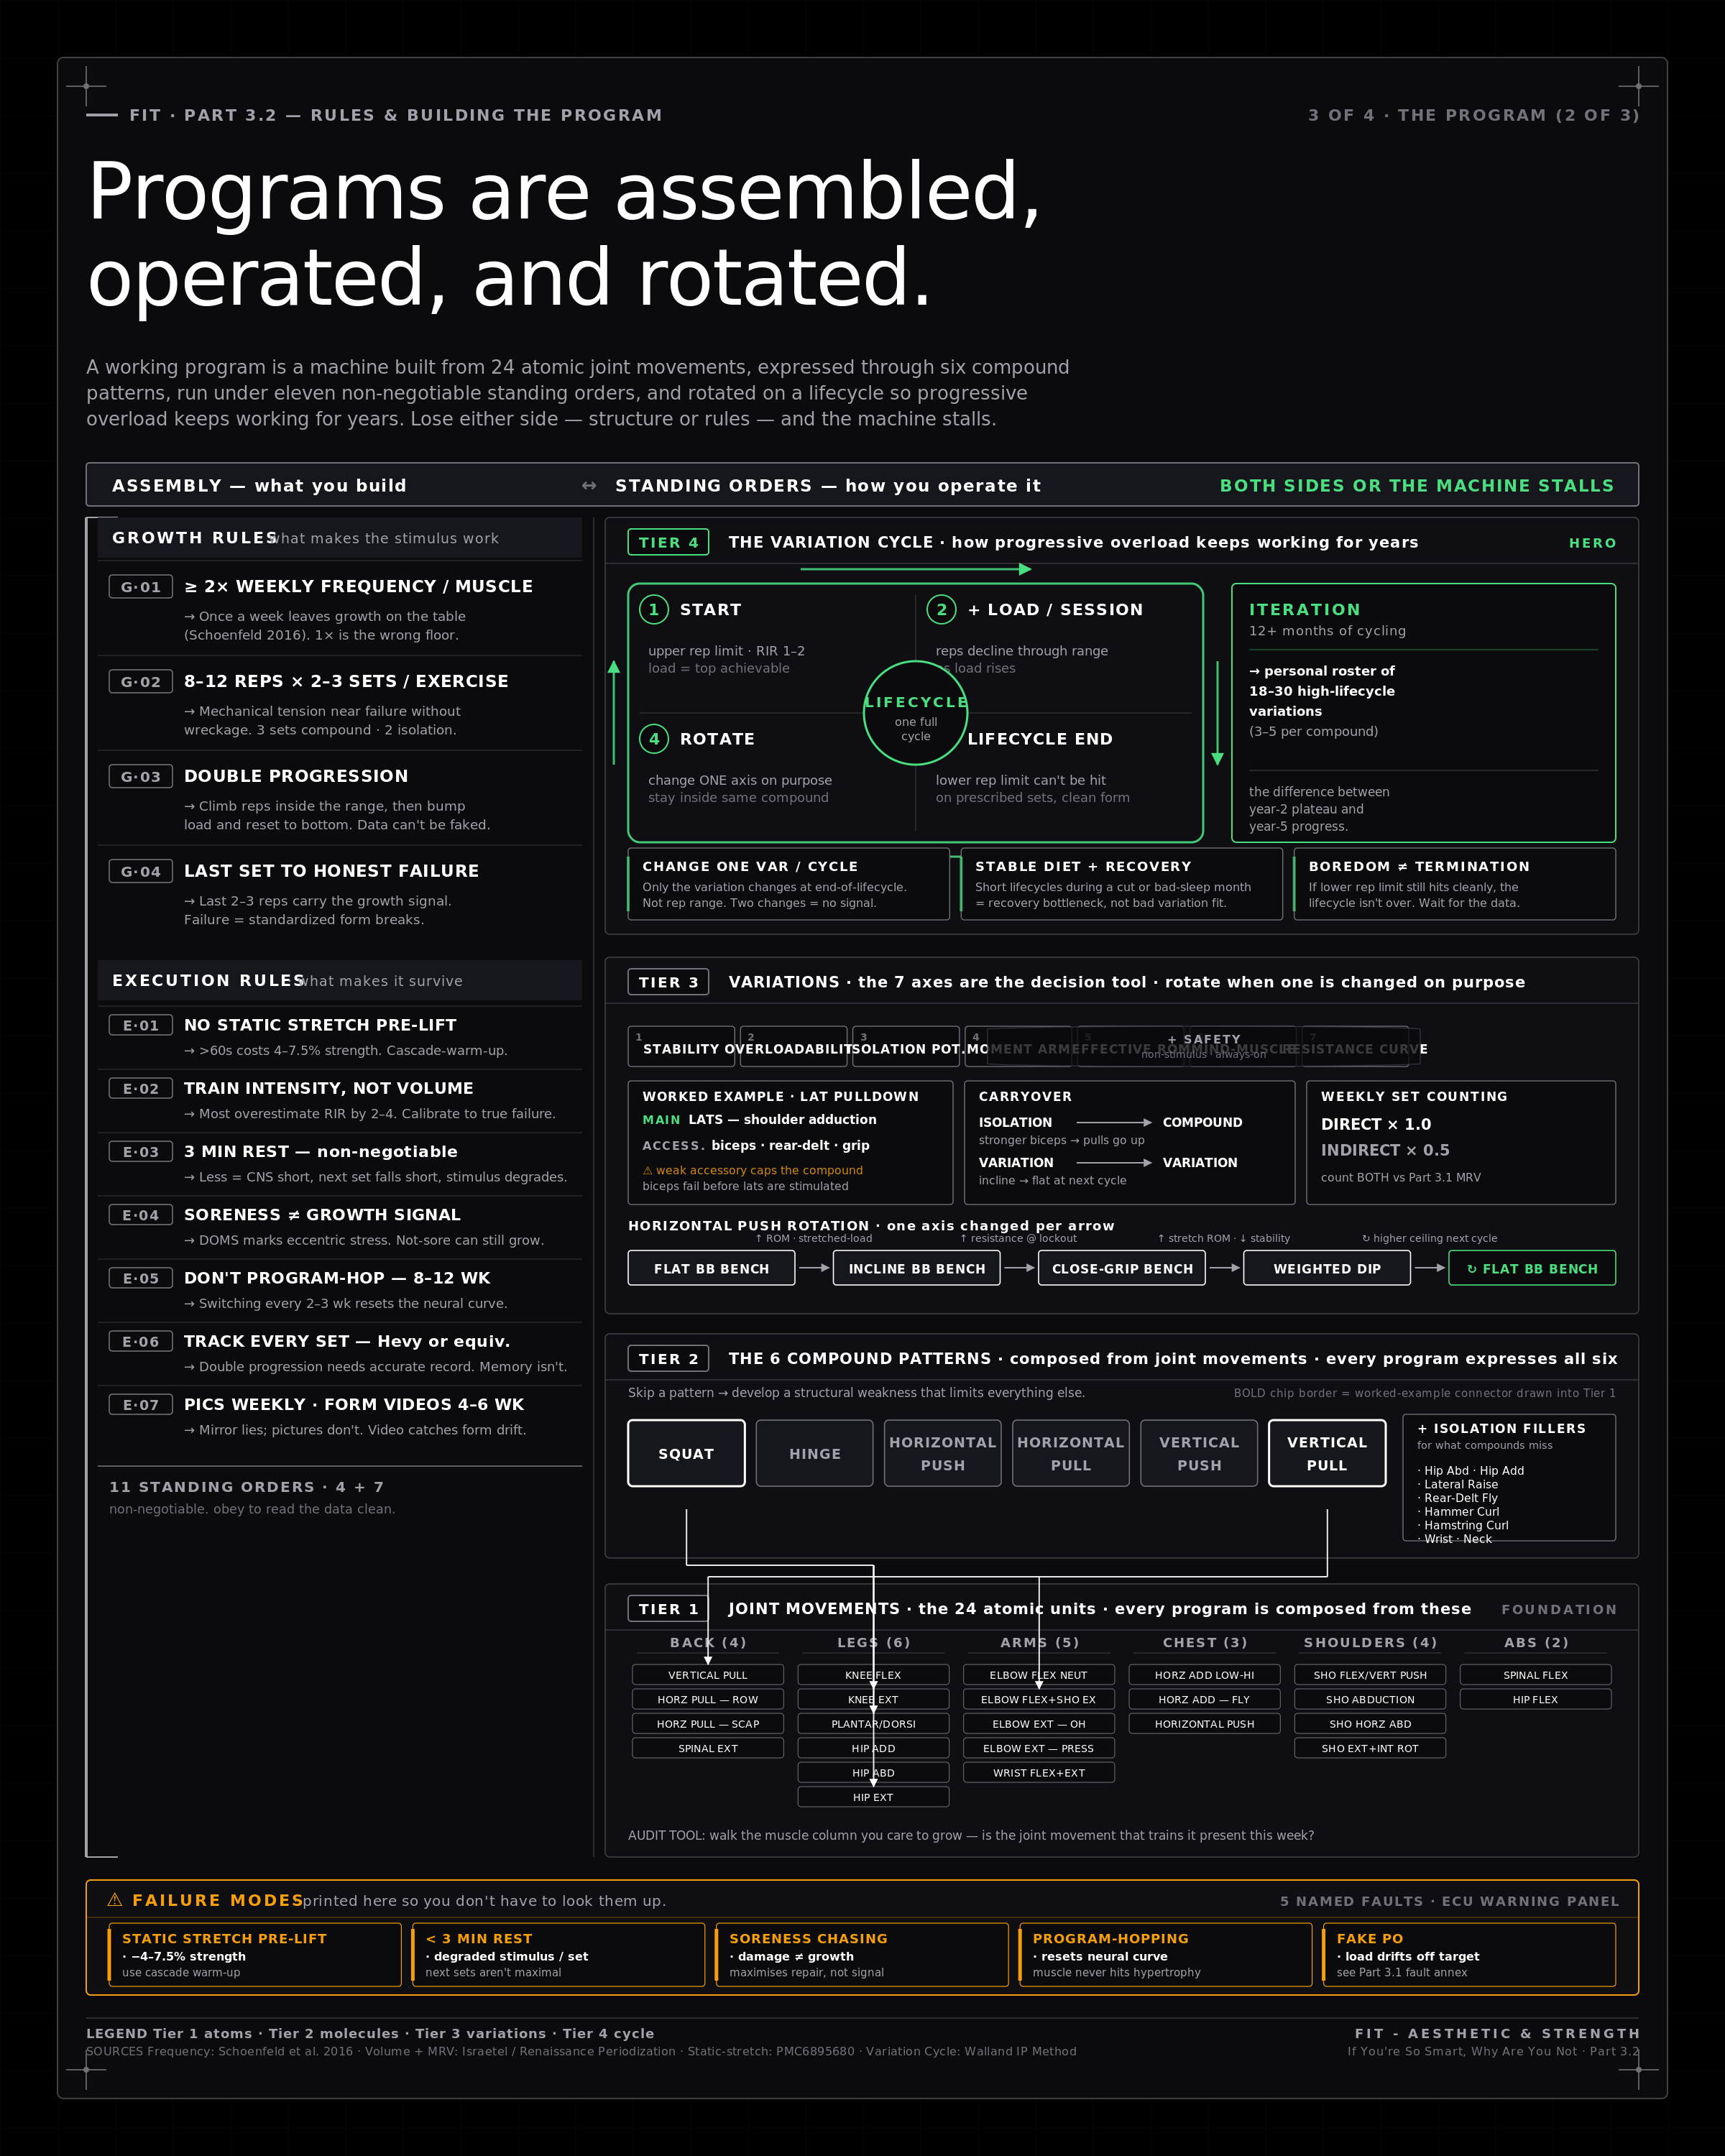
Here’s a clean way to picture how a working program is actually assembled and operated. The right side is the assembly, read bottom-to-top: 24 atomic joint movements combine into the six compound patterns, expressed through variations chosen along the seven axes, and rotated by the Variation Cycle so progressive overload keeps working for years. The left rail is the standing orders — the four growth rules and seven execution rules you obey every session — with the named failure modes printed below so they can’t be forgotten. Pin it up beside the rack; cross-check the assembly when designing a block, scan the standing orders before every session.
Part 3.2 Takeaways
Key concepts to internalize
The four growth rules: 2× weekly frequency per muscle, 8–12 reps × 2–3 sets, double progression, last set to failure (with form as the cue).
The execution rules separate the lifters who progress from those who plateau: skip pre-lift static stretching, train intensity (not just volume), rest 3 minutes between sets, ignore soreness as a metric, don’t program-hop, track everything.
Form is the referee. A repeatable form makes the form-break rep the honest signal of mechanical failure. Cheat reps are fake progressive overload.
Visual checks beat memory. Weekly progress pictures + form-check videos every 4–6 weeks are the only way to catch slow drift.
Programming starts with the 24 joint movements. Naming the movement (vertical pull, shoulder horizontal adduction) clarifies redundancy and gaps. The muscle-to-movement table is an audit tool — every muscle region should be reachable through at least one movement in the week.
Compounds emerge from joint movements. The six fundamental compound patterns (squat, hinge, vertical/horizontal push, vertical/horizontal pull) are each a combination of two or more joint movements. All six must appear weekly.
Single-joint movements fill the gaps the compounds miss — and break bottlenecks inside compounds. Hip abduction, lateral raises, hammer curls don’t show up in any compound; they need direct sets.
Compounds are limited by their weakest accessory. Bench stalls because of weak triceps; rows stall because of weak biceps. Attack the bottleneck directly for 4–8 weeks, then return to the compound.
Carryover runs in two directions. Isolation strengthens compound-pattern lifts. Strength on one variation transfers to other variations of the same pattern. Both effects compound over years.
Direct and indirect sets both count toward weekly volume. A muscle hit with 6 direct sets + 6 indirect sets is closer to 10–12 effective sets — relevant when auditing against MRV.
The seven axes of variation explain why one variation differs from another: stability, overloadability, isolation potential, moment arm, effective ROM, mind-muscle connection, resistance curve / biasing — plus safety as a non-stimulus consideration. Use them to pick the next variation in a rotation intentionally.
Every variation has a finite lifecycle. When the lower rep limit can no longer be hit on a variation, the lifecycle is over — rotate to a new variation of the same compound pattern, don’t grind it out with more volume.
Iteration produces a personal exercise roster. Over 12+ months, the lifter learns which 3–5 variations per pattern produce the longest lifecycles. That roster is what keeps progress alive in year three and beyond.
Your Pre-Program Task List
Before running a template from Part 3.3, lock these in.
- Set rep ranges and starting loads in Hevy for every exercise you plan to run. Use the double progression rules — pick a load that lets you hit 8 clean reps with 1–2 RIR on the last set.
- Schedule the 3-minute rest timer. Hevy and most workout apps include one — set it to start automatically after each working set. No phone-scrolling beyond the 3-minute mark.
- Pre-commit to no static stretching pre-lift. Replace it with the cascade warm-up protocol (empty bar → 50% → 75% → working) on the first exercise per muscle group.
- Set a recurring “form-check video” reminder every 4–6 weeks. Pick the day of the week you’ll record working sets on the three most-loaded compounds.
- Set a recurring “progress pictures” reminder weekly or biweekly. Same lighting, same poses, same time of day.
- Audit your week against the 24 joint movements. Walk through the muscle-to-movement table and confirm every muscle region you care to grow has a joint movement covering it. Any gap = a region not being trained.
- Audit your week against the six compound patterns. Squat, hinge, horizontal push, horizontal pull, vertical push, vertical pull — all six must appear. Identify any missing pattern before you start.
- Pick one weak-link accessory per compound that’s stalled. Schedule 4–8 weeks of focused isolation work on it before retesting the compound.
- Commit to 8–12 weeks before changing the program. Write the start date down. Don’t evaluate the program before the window closes.
- Pre-pick 2–3 variations per compound pattern for the Variation Cycle rotation. For each of the six patterns, list the starting “key” variation plus 2–3 candidate rotations to swap to when the lifecycle ends. Note for each candidate which axis (stability, ROM, resistance curve, etc.) is being changed and why.
- Define the lifecycle exit condition explicitly. “When I can no longer hit [lower rep limit] on the prescribed working sets with clean form, this variation is done.” Write it next to the program. This prevents grinding past the productive window.
Up next That's the rule layer and the structural building blocks. Part 3.3 — Example Programs puts all of this into actual templates — week-by-week splits with exercise selection that can be run as-is or adapted.
Disclaimer Not coaching or training advice. This reflects general principles and the reasoning behind them. For new lifters or anyone with joint issues, getting a handful of sessions with a qualified coach to dial in form is worth more than any program on the internet.
Sources & references
Footnotes
-
Schoenfeld et al. (2016), “Effects of Resistance Training Frequency on Measures of Muscle Hypertrophy: A Systematic Review and Meta-Analysis.” Discussion at strongerbyscience.com — frequency for muscle and follow-up meta-analysis at tandfonline.com — training frequency review. ↩
-
Mechanical tension as the primary driver of hypertrophy and the role of high-threshold motor unit recruitment near failure: see review at PMC5086326 and broader discussion in current hypertrophy literature. ↩
-
Static stretching effects on subsequent strength and power: short-duration (≤60 s) trivial effect, longer-duration produces 4–7.5% performance decrement. See PMC6895680 and Paul Ingraham’s overview at painscience.com — stretching. ↩
-
The Variation Cycle as presented here is an adaptation of the Iterative Periodisation (IP) Method developed by coach Jon Walland — a programming methodology for systematizing variation rotation, lifecycle management, and long-term carryover between movement-pattern variations. The framework has been folded into the broader joint-movement / compound-pattern / accessory architecture of this article, with terminology adapted to the rest of the series. ↩